Use Akamai's Metadata Service with Cloud-Init on Any Distribution
Traducciones al EspañolEstamos traduciendo nuestros guías y tutoriales al Español. Es posible que usted esté viendo una traducción generada automáticamente. Estamos trabajando con traductores profesionales para verificar las traducciones de nuestro sitio web. Este proyecto es un trabajo en curso.
Akamai’s Metadata service gives you the ability to automate system configuration when deploying Compute Instances. This is primarily accomplished by adding user data in the form of cloud-config scripts. These scripts are processed by the cloud-init software running within the system of the newly deployed instance. To learn more about adding user data and user data formats, review Add User Data When Deploying a Compute Instance.
Cloud-init has supported Akamai’s Metadata service since version 23.3.1 (released in August 2023). While this version of cloud-init has been included in several of the distribution images offered by Akamai, most distributions do not have cloud-init installed by default. Furthermore, the version of cloud-init provided in most distributions’ package repositories is older and incompatible with the Metadata service.
This guide walks you through how to install a new version of cloud-init on distributions that are currently not officially supported by the Metadata service. By doing so, you can create Metadata-ready distribution images so that you can start reusing your existing cloud-init scripts on Akamai’s platform.
Deploy a Compute Instance
The first step is to create a fresh Compute Instance running the distribution of your choice. If the selected distribution is already marked as cloud-init compatible, you do not need to follow the steps in this guide. If the distribution is not cloud-init compatible, continue with this guide to create a cloud-init compatible image for this distribution. For details on Metadata/cloud-init compatibility, review Overview of the Metadata Service > Availability.
This instance forms the basis for a cloud-init deployment template. See our Getting Started with Linode and Creating a Compute Instance guides. The instructions in this guide cover Debian, Ubuntu, and RHEL-based systems (CentOS, Fedora, AlmaLinux, Rocky Linux, etc.). The steps have not been verified with other distributions but may be adaptable with some modifications.
Install Cloud-Init
Akamai’s Metadata service requires that an instance have cloud-init version 23.3.1 or newer. While cloud-init can be installed through package managers on most distributions, typically those versions are older and do not support Akamai’s Metadata service. The steps below show you how to install cloud-init from the source.
Install Git and Pip for Python 3.
apt update
apt install git python3-pip
dnf install git python3-pipClone the cloud-init Git repository, and change into the repository directory. This step also first changes into the
/tmp/directory, since the repository only needs to be stored temporarily.cd /tmp/ git clone https://github.com/cloud-init/cloud-init.git cd cloud-init/Install the project’s prerequisites.
pip3 install -r requirements.txtWith some newer distributions, you may need to run the above with the
--break-system-packagesoption. This overrides a specification that attempts to prevent conflicts between the OS package manager and Pip.pip3 install -r requirements.txt --break-system-packagesNote The PEP 668 specification attempts to prevent conflicts between Python packages installed via the OS package manager and PIP. The specification recommends installing packages with Pip in Python virtual environments, like Virtualenv.
That approach does not work well with the cloud-init installer, so the steps here recommend overriding the specification. In our tests, this did not result in any issues, but be aware that the use of this option can impact the behavior of some Python packages.
Build and install cloud-init from the project.
python3 setup.py build
python3 setup.py install --init-system systemd
Configure Cloud-Init
A few configuration steps are necessary to prepare the cloud-init installation for running properly on the instance. The steps below start up cloud-init and add the Akamai data source needed for making deployments with the Metadata service.
Initialize cloud-init on the system. Doing so also outputs the version; make sure the version is at least
23.3.1to ensure compatibility with the Akamai Metadata service.cloud-init init --localCloud-init v. 23.3.3 running 'init-local' at Mon, 27 Nov 2023 22:31:40 +0000. Up 105.67 seconds.Verify the status of the cloud-init service.
cloud-init statusstatus: runningAdd
Akamaito thedatasource_listin one of the cloud-init configuration files. Locate the appropriate configuration file as follows.On many new Akamai Compute Instances, a cloud-init configuration file is included at
/etc/cloud/cloud.cfg.d/99-linode.cfg. This configuration takes priority, and if you have it you should add the data source there.If you do not have the
99-linode.cfgfile mentioned above, you should add the data source in the default cloud-init configuration file:/etc/cloud/cloud.cfg.
In either case, find the
datasource_listand addAkamaias the first entry, as shown below. If thedatasource_listoption is not already in the configuration file, add it withAkamaias the only item in the array.- File: /etc/cloud/cloud.cfg.d/99-linode.cfg
1
2
3
4
5
... datasource_list: [ Akamai, NoCloud, ConfigDrive, None ] ...
Shut down the instance, either from the command line with the command below or from within the Cloud Manager.
shutdown
Create a Custom Image
Creating an image from the instance setup above allows you to deploy new instances leveraging the Metadata service and custom cloud-init deployment scripts. For more on creating an image of an Akamai Compute Instance, you can refer to our Capture an Image guide.
What follows is a summary of steps you can use to create a base image from the instance on which you installed cloud-init.
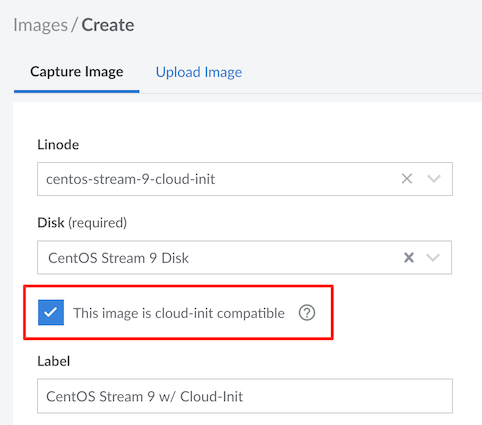
Navigate to the Images section of the Cloud Manager.
Select Create Image.
On the resulting form:
- Select the Compute Instance on which you installed cloud-init
- Select the associated disk drive
- Indicate that the image is cloud-init compatible
- Give the image a label
- Choose the option to Create Image

Wait for the creation process to complete. You can see its progress from the Images section of the Cloud Manager.
Deploy an Instance with User-Data
With a base cloud-init image ready, you can deploy a new instance of the Metadata service and cloud-init user data whenever you need. Refer to our guide on how to Deploy an Image to a New Compute Instance for image deployment. Refer to our guide on how to Use Cloud-Init to Automatically Configure and Secure Your Servers for more on adding user data to new instances.
The steps that follow walk you through a simple new deployment from a base cloud-init image. This includes a simple cloud-init user data script modeled on our Setting Up and Securing a Compute Instance guide.
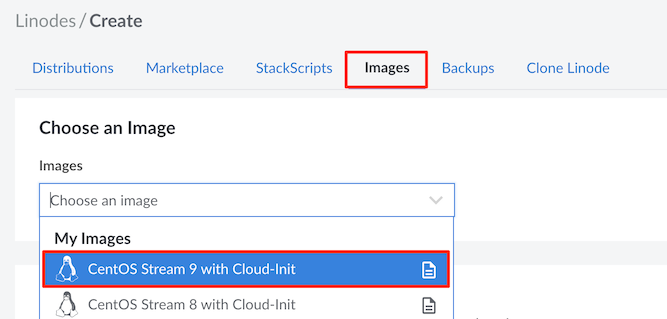
Navigate to the Create Linode section of the Cloud Manager and select the Images tab.
In the Images dropdown menu, select the image that you just created.

Select a region in which the Metadata service is available. These are listed in the Metadata reference documentation.
Select your desired instance plan, enter a label for the new instance, and create credentials for the root user.
Expand the Add User Data section, and input your desired user data. What follows is a basic example useful for many new instances.
 1
 2
 3
 4
 5
 6
 7
 8
 9
10
11
12
13
14
15
16
17
18
19
20
21
22
23
24
25
26
27
#cloud-config # Configure a limited user users: - default - name: example-user groups: - sudo sudo: - ALL=(ALL) NOPASSWD:ALL shell: /bin/bash ssh_authorized_keys: - "SSH_PUBLIC_KEY" # Perform system updates package_update: true package_upgrade: true # Configure server details timezone: 'US/Central' hostname: examplehost # Harden SSH access runcmd: - sed -i '/PermitRootLogin/d' /etc/ssh/sshd_config - echo "PermitRootLogin no" >> /etc/ssh/sshd_config - systemctl restart sshd
Start the deployment by selecting Create Linode, and wait for the new instance to be deployed. You can follow its progress from the Linodes section of the Cloud Manager.
Access the instance as the root user through the Lish console. Learn how in our Access Your System Console Using Lish (Linode Shell) guide.
Reset cloud-init. This ensures that, on the next boot, cloud-init runs as if for the initial system boot.
cloud-init clean && cloud-init clean --logsReboot the instance.
reboot
Once the instance boots back up, you can verify cloud-init execution by logging in as a created user — example-user in the example above. You can also use the steps in our Use Cloud-Init to Install and Update Software on New Servers guide to verify system package updates.
More Information
You may wish to consult the following resources for additional information on this topic. While these are provided in the hope that they will be useful, please note that we cannot vouch for the accuracy or timeliness of externally hosted materials.
This page was originally published on
